Using a captive portal when offering guest WiFi in your business has become an industry-wide practice. This page can improve WiFi security, help collect valuable user information for marketing, and grow your business.
More importantly, providing WiFi is a must for keeping your customers happy. 96% of consumers prefer businesses that offer WiFi. In this guide, we’ll introduce you to captive portals and how to set them up. Keep reading, and you’ll be ready to deploy one for your business in just a few minutes.
What Is a Captive Portal?
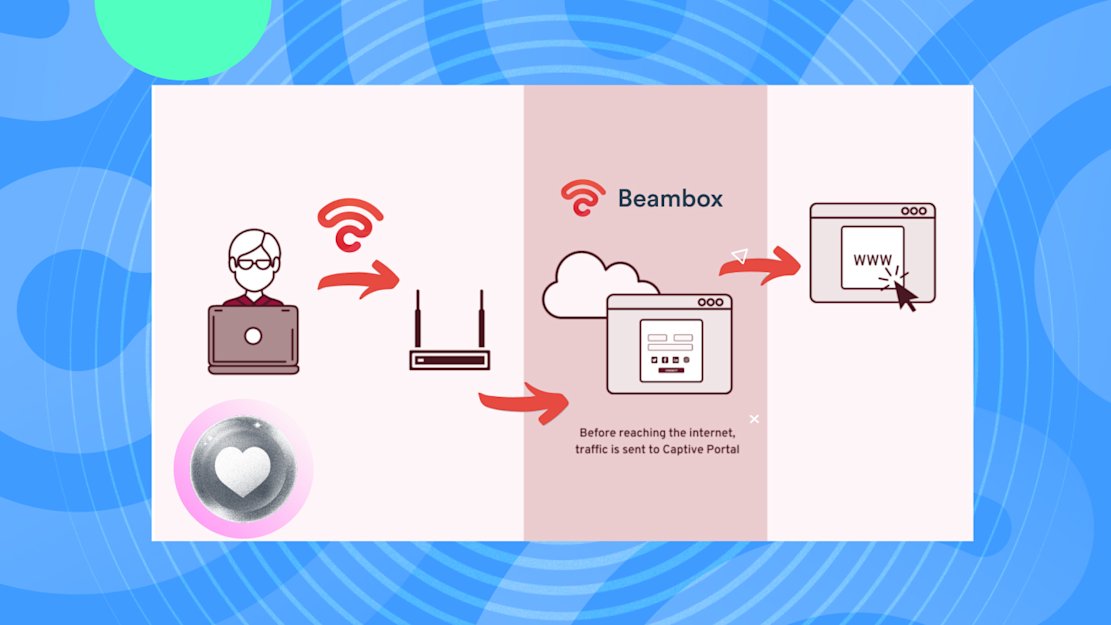
A captive portal is a customizable login page that pops up when users connect to your guest WiFi. It has an intuitive interface where you get to decide what your guests needs to do to access your network. With a WiFi captive portal, your business can:
- Collect valuable customer data like email addresses, mobile numbers, social media handles, and more to power your marketing campaigns.
- Ensure users accept your terms and conditions before using your WiFi.
- Customize the login page with your brand’s visuals, raising brand awareness and ensuring the design looks professional.
Think of a captive portal as a gateway or a toll booth that protects your free guest WiFi service.
The Benefits of a Captive Portal for WiFi
It is essential to understand the importance of captive portals and how they are an invaluable asset for your business. Captive portals enable you to tap into often-overlooked opportunities, as highlighted below:
- Your guests cannot access your network without completing specific actions, like providing information about themselves. This makes it an excellent way to collect first-party data.
- You can establish rules for users to follow when using your free guest WiFi. For instance, you can limit bandwidth and restrict access to specific websites.
- They protect against hackers since they don’t allow unauthorized access to your business’s WiFi.
- You can promote your business’s social media profiles that users can follow to receive timely updates.
- They are handy for displaying ongoing discounts and offers, which can help increase sales.
- You can point users to specific pages, like your business’s website.
Who Needs a Captive Portal Solution?
A captive portal suits any business offering free guest WiFi. Here are some examples of how different industries can benefit from this:
- Cafes: Create branded login pages to engage with your patrons and collect their contact details.
- Restaurants: Provide secure WiFi access to your guests in exchange for invaluable information to build your marketing database. -__ Gyms and spas__: Project loyalty programs and packages on your splash page before guests can use your WiFi.
- Airports, libraries, and museums: People expect airports, libraries, and museums to provide free WiFi. With a captive portal, you can ensure that only visitors have access to your network. It can also prevent people from misusing your WiFi.
- Retail: Collect customer insights, provide exclusive offers, and improve in-store satisfaction by asking your customers for feedback.
- Pubs and bars: Ensure your patrons have internet access while having a good time in your establishment. You can also promote special discounts on specific days of the week to increase foot traffic.
Adding a captive portal to your guest WiFi creates countless growth opportunities, regardless of your industry.
How To Create a Captive Portal for WiFi
Here’s how to create captive portal for WiFi so you can allow only authorized users to access your network.
1. Update Everything
The first step in how to set up a captive portal is to ensure all your network devices are up-to-date. This includes all the routers and switches in your establishment.
It ensures optimal performance and that your devices are compatible with all the features provided by captive portals. After updating, check your network switch to see if it supports the captive portal’s required configurations.
2. Login to Your Router Settings Online
Log in to your router’s web interface by entering its IP address into your browser. This address is visible in the router’s label or user manual.
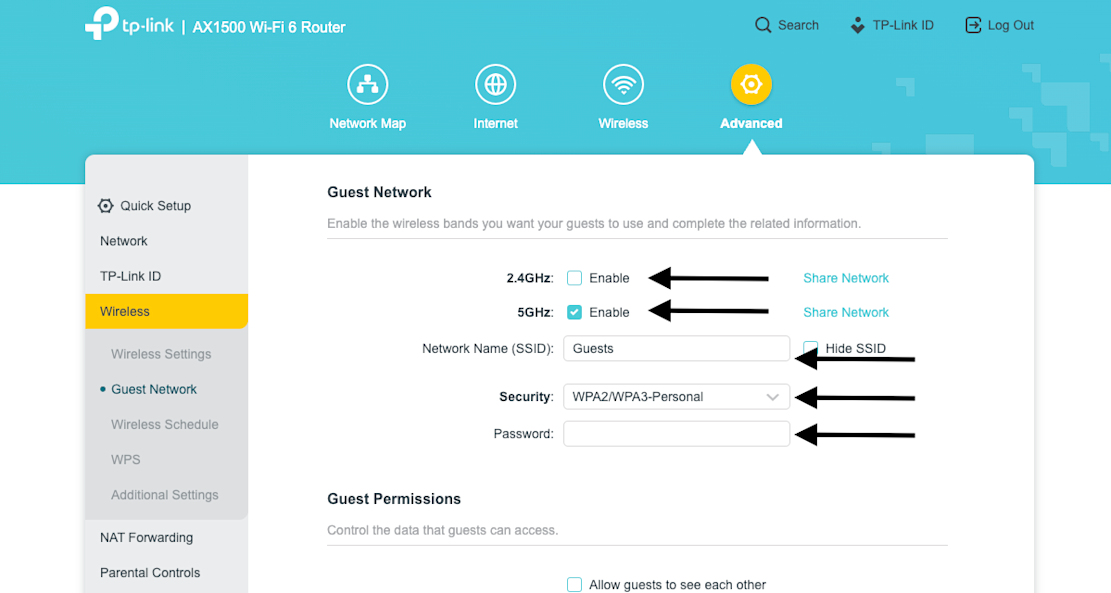
3. Router Settings: How To Setup Captive Portal WiFi
You need to enable the Guest WiFi option within the router’s settings page. Look under sections like Guest Network or Security, as its location varies depending on the router’s model. Once you enable this feature, you can redirect users to a specific webpage and regulate traffic on your network.
4. Pick a Captive Portal Software
You must use captive portal software to ensure your guests can only use your WiFi after completing verification. These days, businesses opt for cloud-based captive portal solutions for the following reasons:
- It’s easy to manage
- You can check whether the portal is active or inactive
- There are several ways to troubleshoot problems
The best part? You can do all these things remotely. Moreover, it is cheaper than controller-based captive portal solutions.
You have to look at your needs before picking a captive portal software. Consider the following factors to determine your captive portal requirements:
- Number of establishments or venues
- Level of customization
- Feature set
- Login methods
- Pricing model
5. Configure Your Captive Portal
Here’s how to make a captive portal and configure it.
- Select or Create an SSID The Service Set Identifier (SSID) is your wireless network’s name. Ideally, you want to pick a title relevant to your business.
You can also include the location of your establishment or guest to ensure the network is easily identifiable. Avoid sticking with generic names that routers create for your WiFi by default.
- Configure Walled Garden Access Walled garden refers to all the websites users can visit without completing the authentication process in your captive portal. A good practice is to allow your guests to check out your business’s page only.
If guests try to access any URL that isn’t on this list, the captive portal page will appear on their devices. This way, you incentivize users to authenticate themselves to remove these limitations.
- Enable Additional Features Decide what features you want to enable to ensure users have an excellent experience on your network. Here are some features you’ll find on various captive portal software:
- Login message: This is the message you want to display to your guests after they complete authentication.
- Bandwidth limits: It controls how much bandwidth each client can use when they’re on your network. This feature helps ensure that users don’t overwhelm your network.
- Session timeout: This determines how long a guest can use your network before they need to authenticate themselves.
- User log: It keeps track of every guest’s activity while on your network. Most software has a time limit on how long it keeps user logs.
Create and Customize Your Splash Page
After configuring your captive portal, you can create a custom splash page. The splash page is what users see after connecting to your network or visiting a site outside the walled garden.
-
Use an Integrated Builder You should use this feature if your captive portal software, like Beambox, has a built-in builder. It simplifies creating a splash page and is code-free. Use the builder to create a layout for your splash page.
-
Achieve a Professional Design You need to ensure the splash page looks professional. At the same time, it must follow your brand guidelines so your guests know it belongs to your business. Change the font, colors, buttons, logo, and text as per your requirements.
Select an Authentication Method
Every portal software provides multiple authentication methods. Each method has different use cases.
-
Choose a Login Option Select how you want your guests to log in to your business’s network. For example, you can ask them to fill out a simple form with their demographics. Patrons must provide their phone number or email address to receive a one-time password (OTP). Or, your guests have to enter their order number to access your network.
-
Implement SSO With Social Networks Single sign-on (SSO) is convenient for your users as they can easily join your WiFi with a few taps. Generally, businesses use SSO via social media, as most people have accounts on various platforms.
This is a win-win situation for everyone. For your guests, it’s straightforward to use your WiFi. You get valuable information about your guests and their social media handles for your business.
Protect Your Guest WiFi
In the last part of this how to set up captive portal guide, you must consider user security. After all, you want your guests to feel safe using your network.
- Implement Security Measures Use the following security features available on your guest WiFi:
- Encryption: You should use WPA2 or WPA3, which are strong encryption methods. This feature lets you create a password for users to access your WiFi.
- Isolation: You must isolate your guest network to ensure users can’t access your business’s infrastructure. Most routers will isolate guest WiFi automatically. However, it’s always best to double-check this before asking guests to connect to your network.
You must keep your router in a location only accessible to you and your staff. You should also update your router’s firmware to ensure there are no vulnerabilities that bad actors can exploit.
- Add DNS-Based Web-Content Filtering Domain Name System (DNS) web-content filtering gives you control over which websites your users can and cannot visit. Add malicious and illegal websites to the blocklist to ensure they are inaccessible to users on your WiFi. Not only does this provide a safe browsing experience for your guests, but it also protects your business.
Collect Customer Analytics
If you use SSO or forms, you can collect user data as your guests connect to your network. Depending on your authentication method, you can get your guest’s name, age, gender, social media handles, email address, and more.
Make sure you inform users about your data collection practices and how you’ll use their information. You also want to ensure you don’t ask for too much information, as this will cause privacy concerns.
Troubleshooting Common Issues
Finally, you want to ensure the captive portal works properly after deploying. You should do a trial run, i.e., deploy it in your establishment and ask your staff to use the portal. This way, you can find issues and resolve them quickly.
Here are some common issues you’ll come across:
- Authentication methods fail
- The captive portal doesn’t load
- Devices don’t appear in the dashboard
You need to go through the configuration page to fix these problems.
At Beambox, if you face any issues with your captive portal setup, you can contact our support team right away. As we’re a cloud-based solution, our team can help fix your problems remotely. Our captive portals come with multiple customization options, making it easy to follow your brand guidelines.
We provide personalized data collection tools and practices depending on where you want to deploy your captive portal. This ensures our cloud-based solution complies with the region’s laws and regulations.
Multiple login options are available, allowing you to choose an authentication method that meets your unique needs.
Partner with Beambox today and deploy the captive portal to enhance guests’ experiences and drive business growth!
Get Started With Free WiFi Marketing
Beambox helps businesses like yours grow with data capture, marketing automation and reputation management.
Sign up for 30 days free